Set up data science project environment with google colab
Content
Motivation
What if we can connect google colab from our local pc terminal, clone github project, add/modify/run scripts/notebooks using google colab’s free GPU power, build model and then publish code into github, then it will be wonderful.
This blog aims to achieve this goal.
Connect google colab with ssh
This part is heavily borrowed from this blog, which I find very useful
What you need?
-
ngrokAccount ssh public key
Go to ngrok and create an account and copy the authtoken only
Example:
./ngrok authtoken <your token>
we need only last argument of command from above.
for second option : run ssh-keygen and just press enter 3–4 times if it asks for anything and then copy the public key.
- run
cat .ssh/id_rsa.pubin the terminal
 Setup Google Colab
Now open googlecolab, connect to desired runtime type and execute following commands in notebook cell:
!wget https://gist.githubusercontent.com/msank00/815d1e722dfe50015fc2310877dd6176/raw/dffb81bb5f72ecfa8502ee3b31312020c778e534/colab-ssh-jupyter.sh
!bash colab-ssh-jupyter.sh
When prompt asks, enter the authtoken and ssh public key respectively. [You already got this from the above 2 steps]
It will print the ssh command to connect to colab instance. e.g
ssh root@0.tcp.ngrok.io -p 16826 # it will be different for your case
Remember: When opening colab, set it to gpu if you want the gpu benefit.
 Setup local terminal
Open terminal in your local pc and run the command you get on colab cell.
You will get a bash shell logged in to colab instance. for jupyterlab, first install following on the terminal :
pip3 install jupyterlab && apt install tmux
Install OH-MY-ZSH:
apt install zsh && sh -c "$(wget -O- https://raw.githubusercontent.com/ohmyzsh/ohmyzsh/master/tools/install.sh)" && echo "ZSH_THEME="af-magic"" >> /root/.zshrc
Now run tmux and run following command in it: (chose port of your choice: $5$ digits random number preferable)
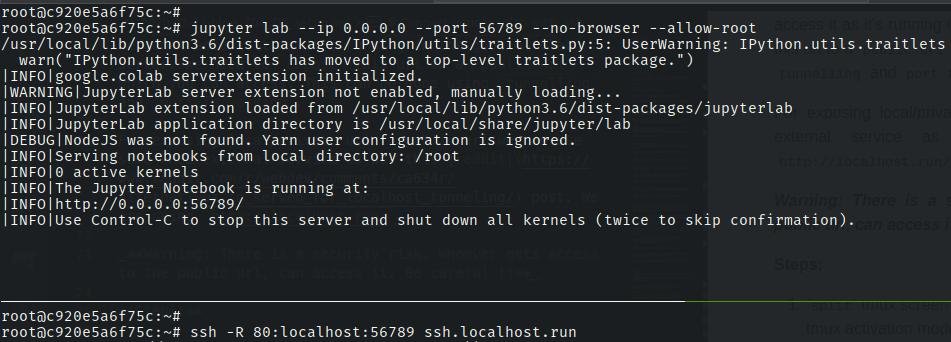
jupyter lab --ip 0.0.0.0 --port 56789 --no-browser --allow-root
Now Jupyter starts running in http://0.0.0.0:56789/, but we can’t access it as it’s running in the google-colab server. We need to expose this url to a public url which you can access. This can be done using tunnelling and port forwarding.
For exposing local/private url to public url we can use some FREE external service as per this reddit post. We are using http://localhost.run/
![]() There is a security risk. Whoever gets access to the public url, can access it. Be careful !!
There is a security risk. Whoever gets access to the public url, can access it. Be careful !!
Steps:
-
splittmux screen horizontally by runningctrl + b(default tmux activation mode) and" - Run the below command
-

 Correct command
ssh -R 80:localhost:56789 $(openssl rand -base64 12)@ssh.localhost.run

# This generates a random string as domain name and creates
# <random_string>@ssh.localhost.run
![]() Note: Keep the same port number which you used for running jupyter, here it’s $56789$
Note: Keep the same port number which you used for running jupyter, here it’s $56789$
And this will prompt a public url in the terminal. Copy it and run in the browser.

*image with old syntax for tunnelling
 What did you achieve after all these steps?
- SSH to google colab
- Starting jupyterlab
- Same computing resource that google colab is using at the backend.
- Now create helper scripts and import them in notebook.
- Instead of a single linear notebook, you can create a project folder and modularize your code easily.
- Apply all the
gitbenefits and finally push togithub. - Can upload files directly into jupyter notebook.
Reference:
- Blog: Googlecolab with SSH
- ngrok
- localhost.run
-
serveo.net
- some time down due to phishing attack
Setup codeserver in Google ColabServer
The best part is yet to come. So far we have decoupled ourselves from the default google colab notebook and have set up jupyter notebook and have exposed the local url to public url. This gives us lots of flexibilities. But it will be good if we can set up a server based IDE. If we can, then we will get the best of $4$ worlds.
- jupyter notebook (module testing)
- google colab’s FREE computing power with GPU
- IDE (project management)
- github (versioning)
Now to set up IDE in google colab server, it’s pretty simple.
 Using VScode Remote Development [Best Approach]
VScode has come up with remote ssh extension which helps you to connect to remote machine and do the development in your local machine. This is quite simple and straight forward.
All you need to do is to use the ssh connection that you receive while setting the google colab via ngrok [mentioned above]. The ssh connection is something like this
ssh root@0.tcp.ngrok.io -p 16826
Configure the ssh extension in your local VScode with the above connection. And done.
For more details check this vscode documentation
 Shortcut
Installing jupyter, tmux can be done quickly using this gist.
Login to the colab using ssh and then do this
$ wget https://gist.githubusercontent.com/msank00/815d1e722dfe50015fc2310877dd6176/raw/dffb81bb5f72ecfa8502ee3b31312020c778e534/colab-ssh-jupyter.sh
$ bash setup_ds_on_colab.sh
- Run
vscodein local machine andsshto colab usingremote explorerplugin. BEST APPROACH
- This step helps to avoid using
ssh.localhost.runorserveo.netwhich are quite unstable in colab’s ssh.
- This step helps to avoid using
*I try to keep updating the gist with latest code-server ide
Reference:
 Limitations
This comes with usual limitations of google colab
- The instance will run for 12 hours and after that it will restart
- After restart, you will loose the codes and uploaded data files
 Solution
For the first part no solution
For the second part some possible solution
- Commit and push code to github frequently.
- Connect google drive with colab and all. But I haven’t explored that path. So don’t know.
![]() FIN
FIN